If you’re on a really tight budget, or you’re worried that you’ve not had enough practice to get a piece looking good why not try this simple Upcycle??
Repurposing, or upcycling, furniture is all about giving existing pieces a new lease of life, whether through restoration of their original features or a whole new look.

I chose to write this blog to encourage all you budding novice up cycler’s!! This has got to be the simplest upcycle for any skill level and almost anyone can achieve this.
I’m going to show you step by step how to create this amazing simple storage, ideal for a hall, bathroom or kitchen!
Yes! It’s so easy it really only takes a small amount of imagination, a few saw cuts and a coat of paint to create this funky stand!

And if you fancy going the extra mile………After base painting, why not learn how to decoupage with ReVamp Boutique and we will teach you how to transform and give your piece its own colourful identity! (More details at the end of this blog!)

Ready to give your first Up Cycle a go? Here’s a list of what you need…
A disregarded or rescued dining room chair with a slighty bowed back if possible ( otherwise the chair can be mounted slightly away from the wall).
Chairs come in all shapes and sizes so first of all take a look at your chair, if you’re unsure then perhaps draw a sketch to give you an idea of the finished look.
Depending on the shape of the chair also decide which way up you would like to mount it on the wall. I decided that I would sit mine legs up and have the back slats bending outwards so I could hang scarfs etc from.
To help you I’ve created a Pinterest board and pinned various chair based ideas! see more ideas in magazines.
What Do I Need?

Pencil and tape measure, set square, Saw, drill, for making holes and screwing, 120 sandpaper, wood fller, Water based satinwood paint and brush, screws, brackets and coat hooks. Mask and safety goggles.
Step 1
Choose the size of your shelf size. Measure and draw a vertical line with a pencil so you have a cutting line to follow with your saw. Cut vertically down ( I chose just after the seat support triangles). Do the same on the other side.

Step 2
Saw across the base cross bars at the back of the chair close to the back legs so they are flush.

Step 3
The chair should now fall apart like so…. The top now becomes the bottom and we disregard the front legs.

Step 4
To make the shelf I used 3/4″ thick pine board but any timber off cut will do as you will be painting and possibly covering.
I lay it where the shelf would sit and with a pencil drew a line along inside the seat top so the shelf would sit inside what was the seat of the chair. This will make the shelf.

Step 5
Once you’ve cut the shelf shape measure the corner and cut out so the shelf fits snugly inside

Step 6
Fill any holes. I used this wood filler which is quick drying and easy to sand.
Once dry smooth off with 120 grit sandpaper and key ( we use sandpaper on the surface in order for the paint to grip to) the rest of the piece ready for painting

Step 7
Its now time to give your creation a coat of paint. If it needs a primer ( We use a primer if there is an unknown subsurface and to insure adhesion.
It also can be built up to create a very smooth finish if sanded in between)

Step 8
Screw your shelf in place with screws. I used the existing screw holes that held the seat pad in place.
Add any hooks for coats and keys at this point…then its ready to put up!

Step 9
By using brackets hang on the wall. ( Always make sure there are no electrical or plumbing cables/pipes where you plan to attach your work. If unsure get professional advice.)

Want to “Yuzz” your creation up abit?
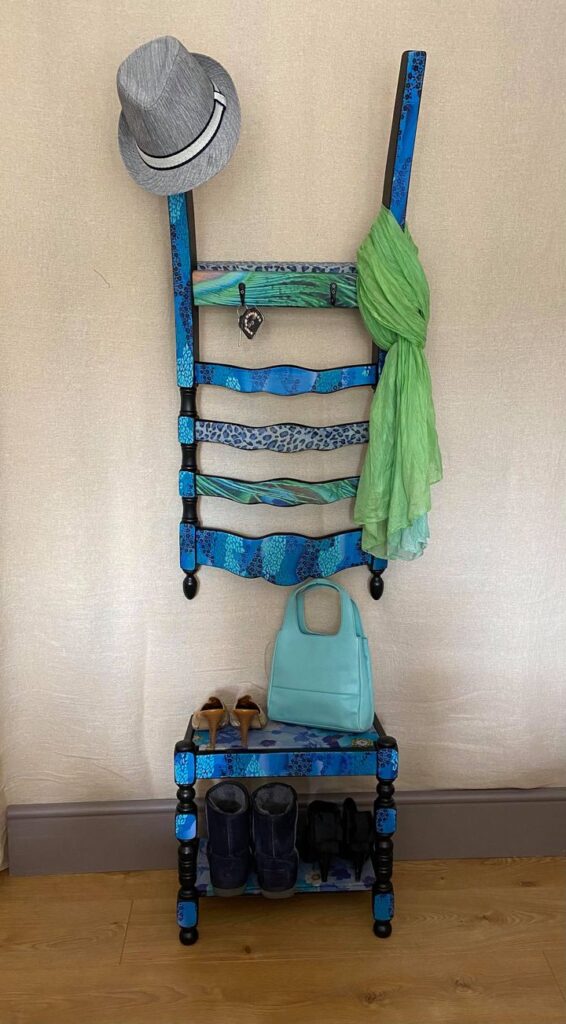
Here is our hall tidy/ boot and hat stand after we decoupaged with fabric, but you could decoupage with paper or any paint finish…
The first before and after picture below is at the simplest level with the top part of the chair shown. Then I looked at the front legs of the chair that I had cut off and it just screamed “Use Me Too!” so I followed the same principals and made the base into a shoe and bag rack to sit underneath.
Of course you can just paint it but in the final picture I decided to Decoupage the top and bottom using fabric. Yes FABRIC!!!
Now you’ve completed your first Upcycle!
We have more ideas and techniques on our blogs or you may want to try our workshops, see our commissions and furniture sale page see ReVamp Boutique